

Schedule Pay Payment Method
Schedule Pay is one method of payment arrangement you can make with your patients. Here’s how it works.
Overview
With Schedule Pay, you are making an agreement with the patient to pay off a care plan with a series of scheduled payments. You can take a deposit amount and then payments on various intervals to make up the total of the amount to pay.
The payments can be taken in one of several ways including over-the-counter, Zero Touch or by your own manual methods.
Notes
It is possible to allow the patient to go into a negative balance with Schedule Pay. If you do not want this to happen, make sure your payment schedule is sufficient to cover the planed care before it is delivered. You may need to increase the deposit or take larger payments sooner especially if you have a ‘tapering’ program where the frequency of visits reduces as the care program progresses. If you want to be sure they can’t go negative, check the box ‘Stop on arrival if money owed’.
The Agreed fee limit is calculated automatically from the sum of the deposit and instalments.
The scheduled payments must end before end of care program or they won’t be billed.
It is common for schedule pay to go into arrears with tapering programs. If you don’t want that, do your maths to ensure your plan doesn’t go negative and check the box ‘Stop on arrival if money owed’
As ZT payments are received, they are automatically assigned to the oldest outstanding ledger so you don’t have to do anything to keep the ledgers in order once set up.
Options
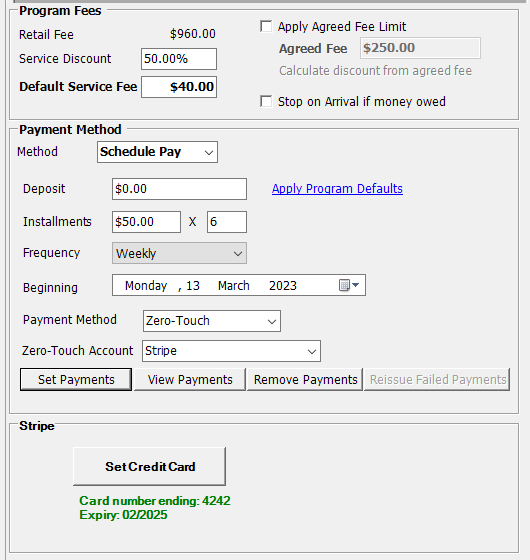
Service Discount / Default Service Fee: Use this to set the amount that will be billed per visit.
Apply Agreed Fee Limit: If checked, the patient will not be billed beyond the Agreed Fee i.e. they will be billed zero. This is common practice in Scheduled Pay to ensure the fees are capped.
Agreed Fee: The max the patient will be billed automatically on this program. This is calculated automatically from the deposit and instalments.
Stop on Arrival if money owed: Check this box to ensure patient is not automatically called if in arrears.
Deposit: The initial payment made by the patient
Instalments: The amounts to be paid
Frequency: The interval between the payments
Beginning: The date for the first instalment. This date can be in the past. It will only process past payments from up to one calendar month in the past.
Payment Method: How the payments will be made. Use ‘Zero-Touch’ to automate the payments, ‘Arrival’ to generate a series of arrival stops so the patient can pay over-the-counter.
Zero-Touch Account: The ZT account to use for the payments.
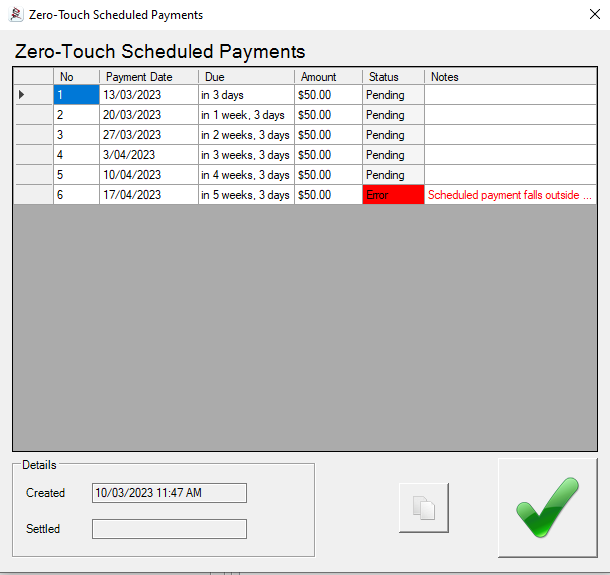
Once you have these set correctly, click the ‘Set Payments’ button to create the scheduled payments. You will see a list of times that the payments will be due. The payments will not be taken if you miss this step!
Click ‘View Payments’ to see those dates again. If there are errors with your payments these will show here with a reason. ***Make sure to review this list***
Click ‘Remove Payments’ to remove the scheduled payments. Note that this is absolutely critical that any scheduled payments are removed if you are looking to change the payment method for any patient, otherwise the payments will still be processed on the scheduled dates, even if the payment method has been changed.
*Note (update Nov 2022): If you ‘remove payments’ and ‘set payments’ again remember to review your settings like ‘beginning date’ and ‘installments’. Spinalogic will not re-process payments scheduled for the same day as payments already fulfilled.
Finally, if using ZT, click ‘Set Credit Card’ to enter the patient credit card details.
Other Choices
If you find yourself doing weekly Schedule Pay’s you may find it better to use Membership as it is much easier to manage.

